
HOW TO CREATE FUNNEL
HOW TO CREATE FUNNEL
5 Mins Read |
The Top 3 Onboarding Automations, That Every Service Business Should Be Using
Try similar courses to learn how to build apps without code and master your no-code skills.
Step 1 : Creating Your Funnel in Systeme.io
From your Systeme.io dashboard, click on Funnels in your main menu. As shown below.
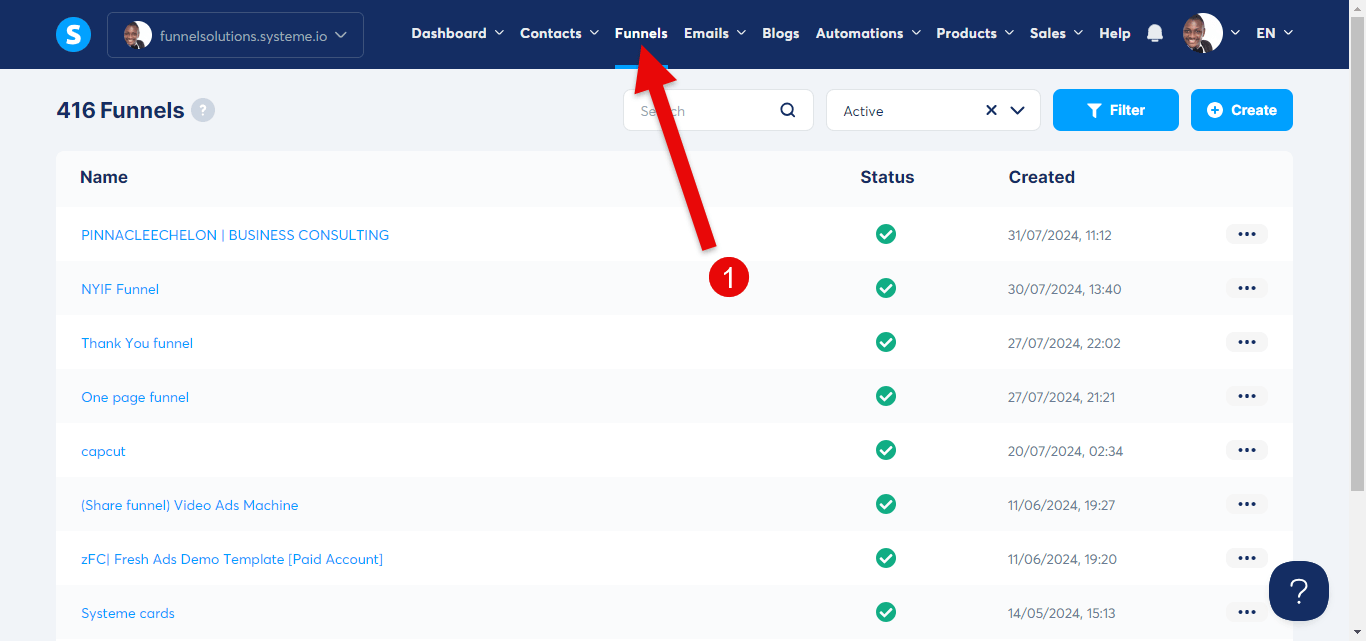
From your dashboard, click on Funnels in your main menu. As shown below. (Image number 1).
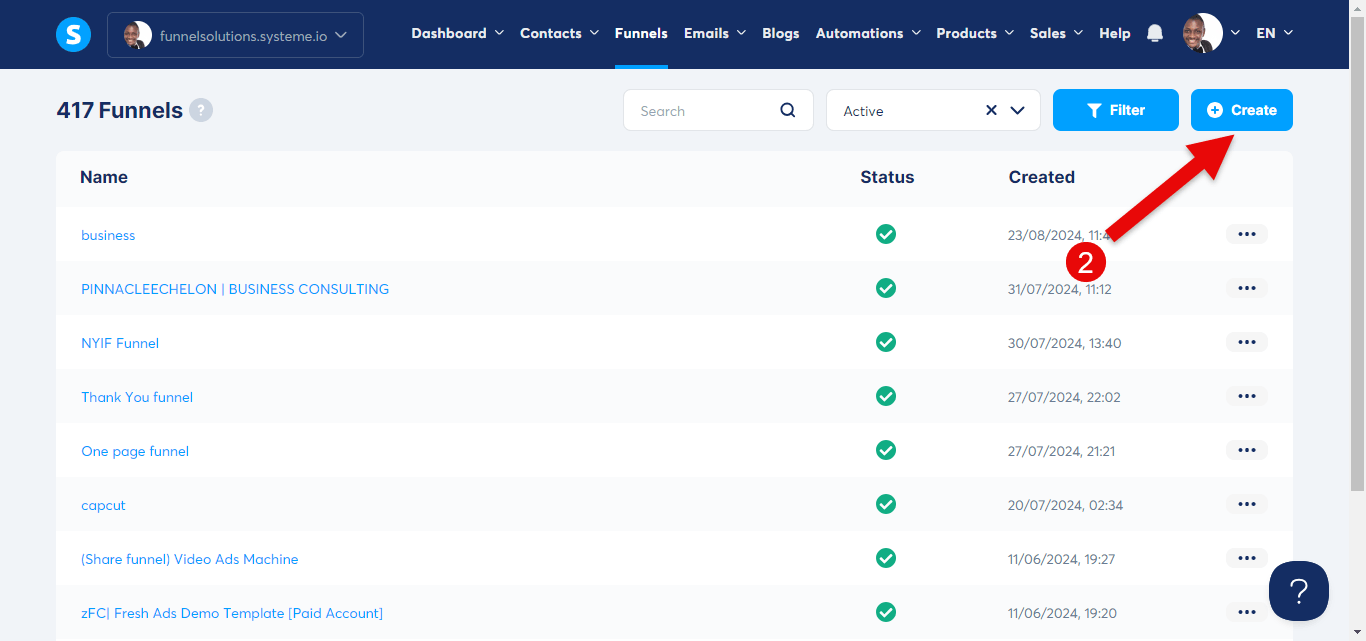
Then click on the “+ Create” button at the top right side (image number 2).
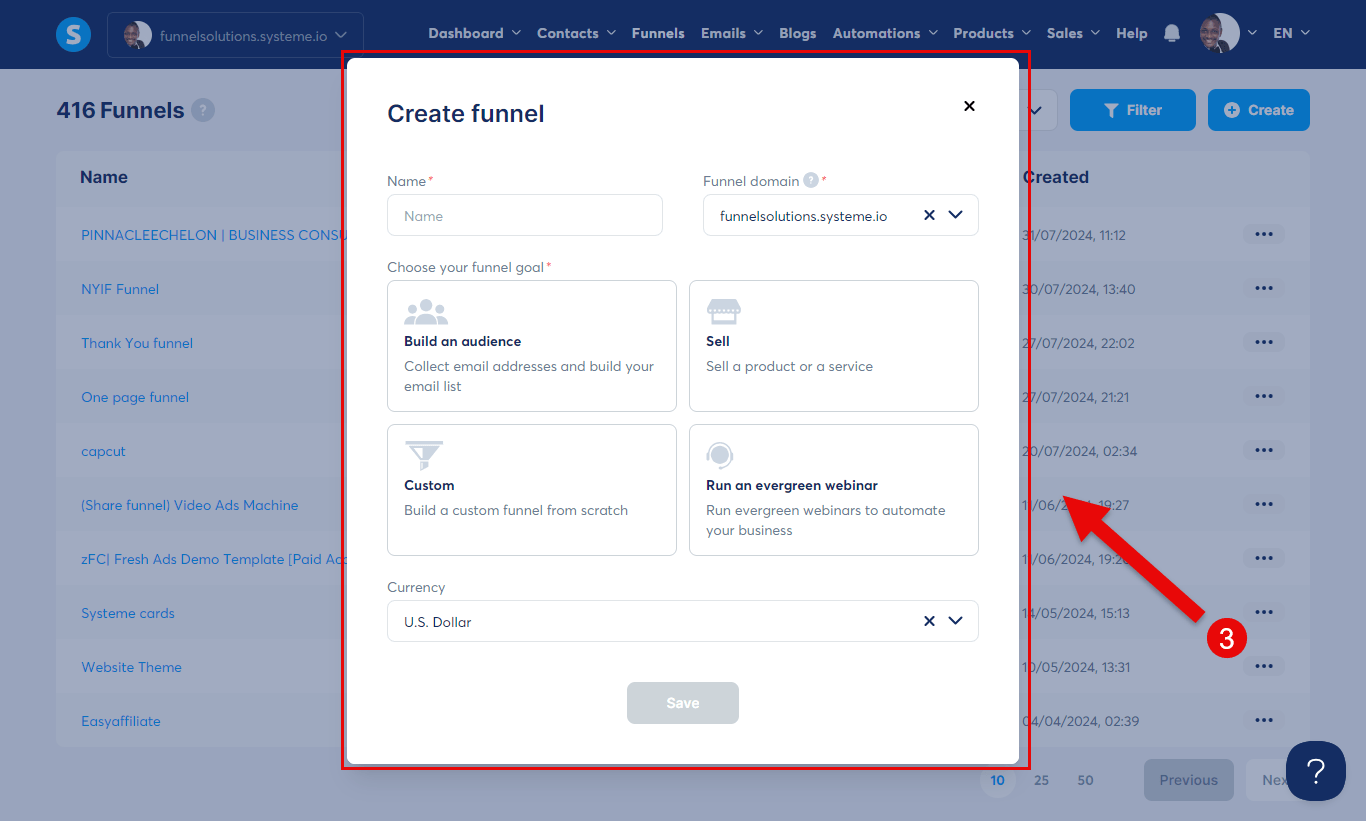
A pop-up will appear, fill in the information in the provided fields and click save. (Image number 3).
Step 2 Create a page.
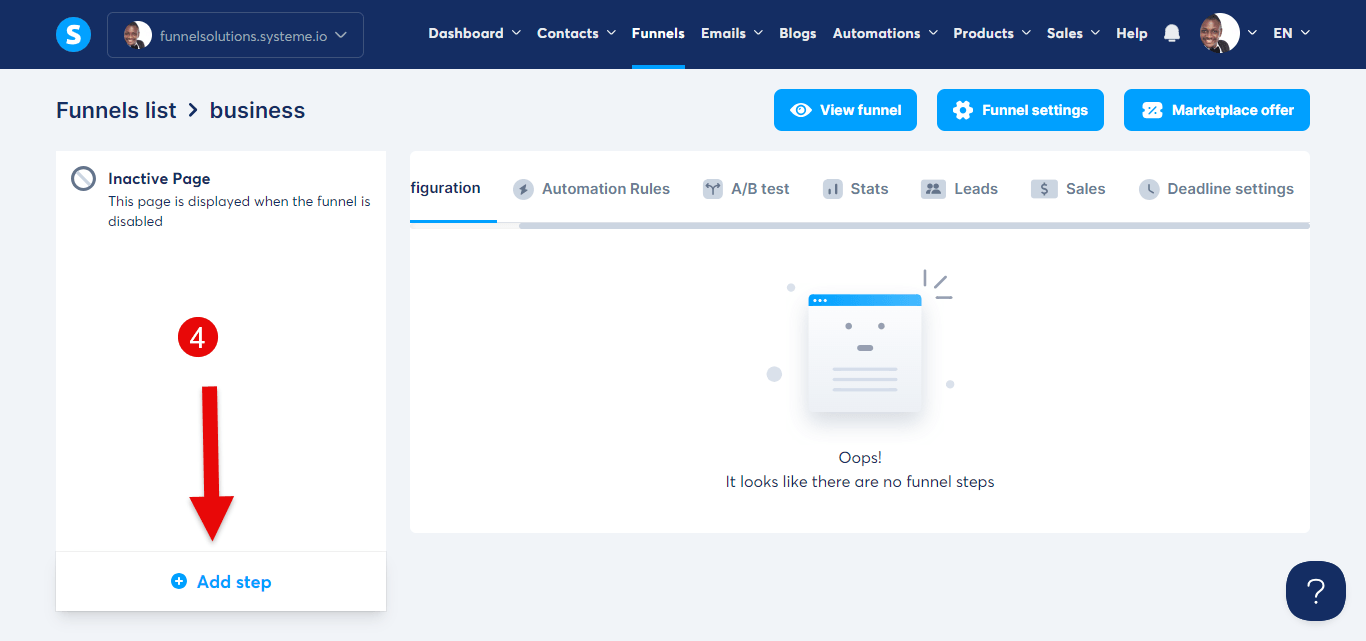
-Next, click on the funnel, this will take you to the next step.
-Click on the “+ Add Step” button on the top right corner to create a page(Image number 4)
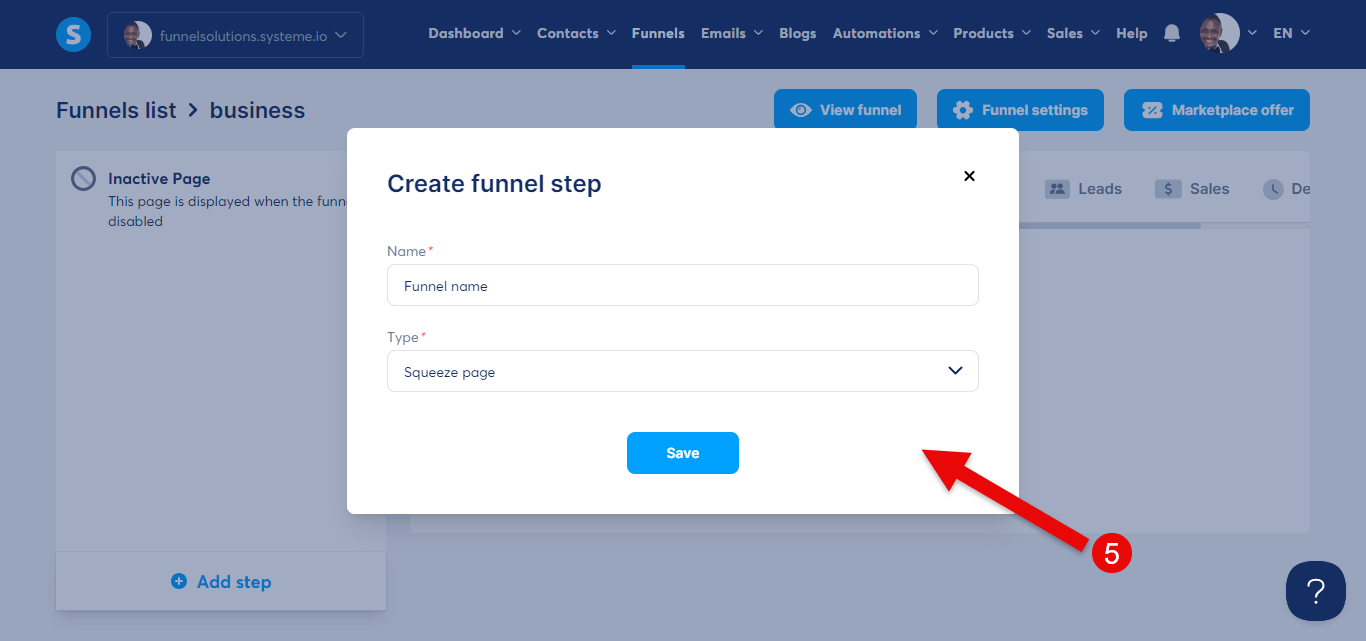
-A pop-up will appear, fill in the name of the page, click the dropdown and select "Optin page" then click save (Image number 5)
Step 3- Choose a template.
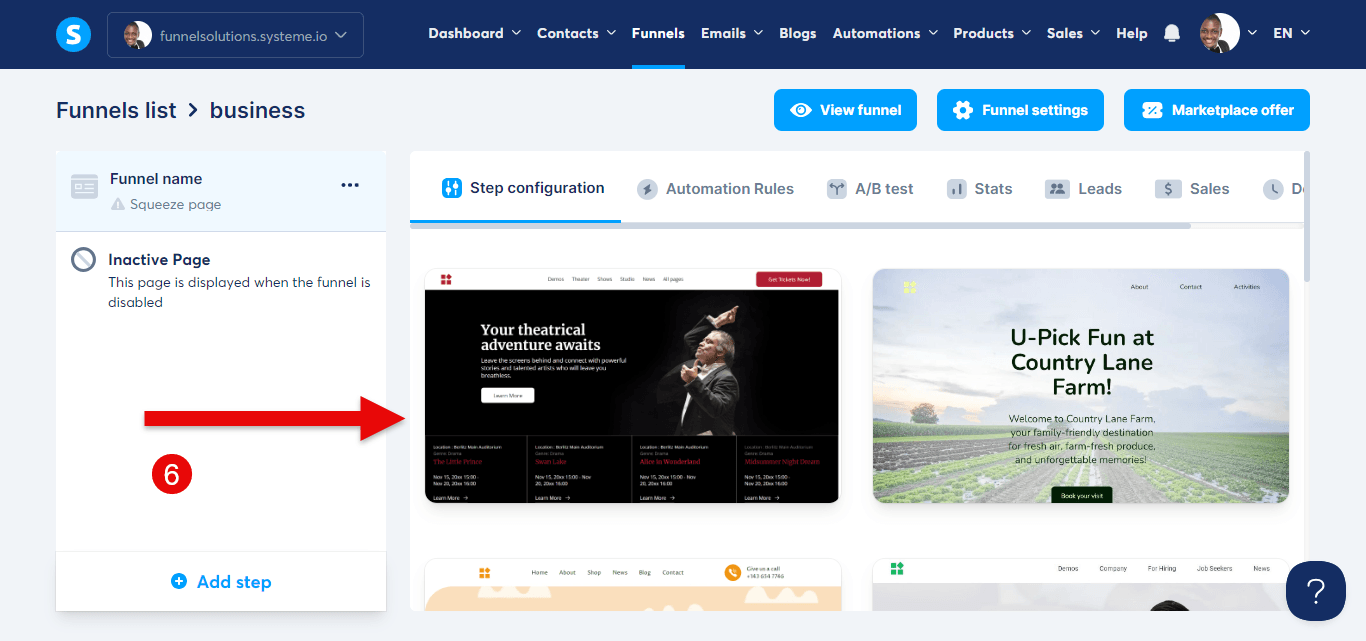
From the list of templates, select any template of your choice, you can even preview it if you like to help you make a choice. (Image number 6)
Step 4 — Edit
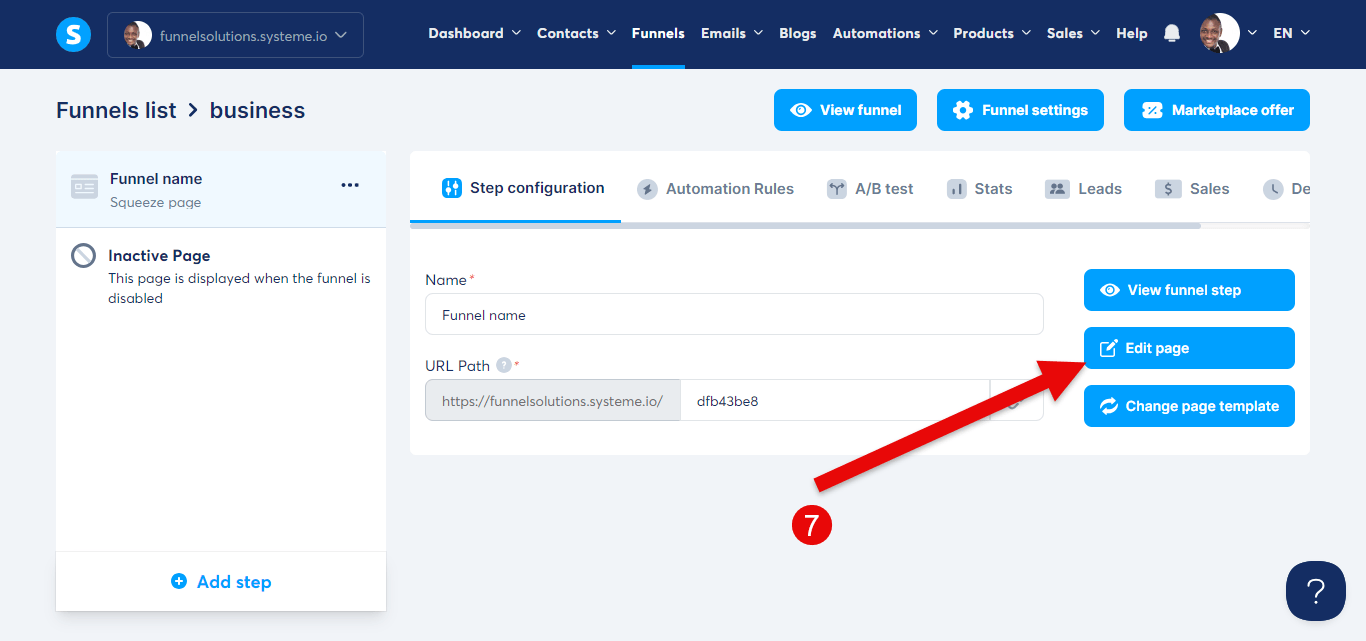
-Click the "edit page" button to edit your page (Image number 7).
-Then modify your page by simply dragging and dropping elements like text, images, and forms, or edit the template to suit your business needs.
-Set up your buttons to ensure it goes to the correct URL or next page.
-You can customize each element by adjusting fonts, colors, sizes, and other properties.
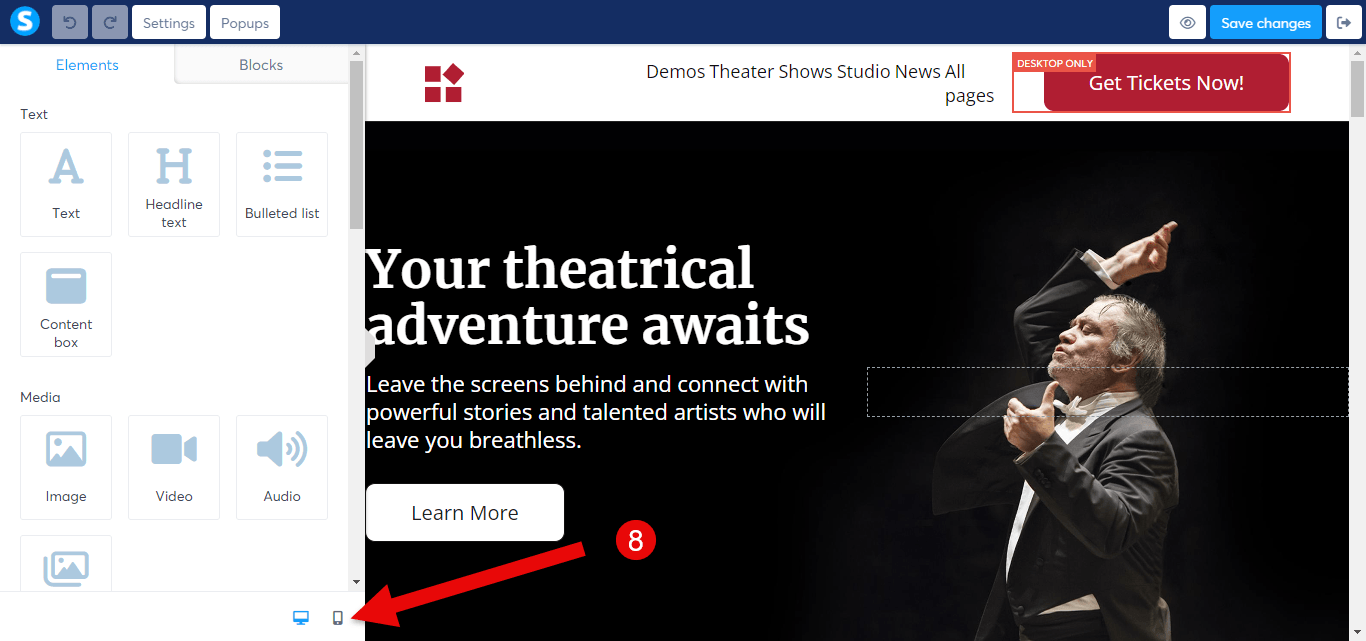
-You should adjust the elements to be responsive to the mobile version by clicking on the phone icon (Image number 8).
Preview
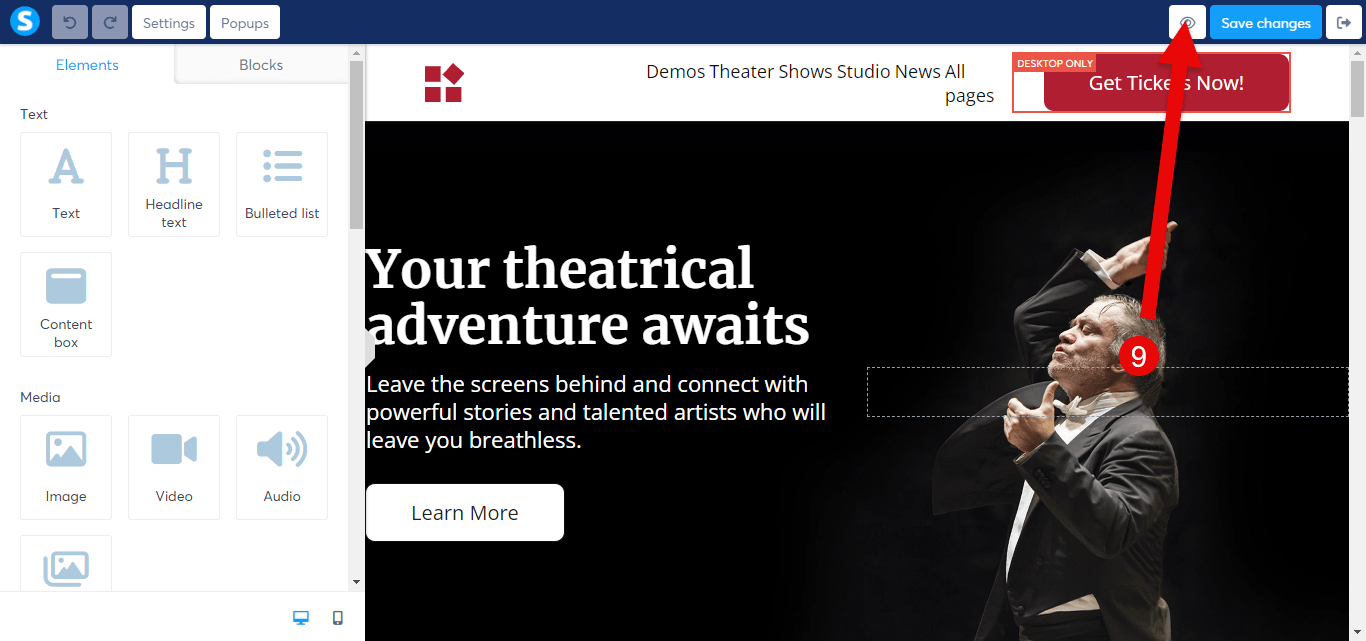
When you are done editing, click the "preview button” (button with the one icon) to see what the page looks like (image number 9)
create a tag.
In Systeme, tags are used to manage and organize contacts for better-targeted marketing, campaign engagement, and conversion.
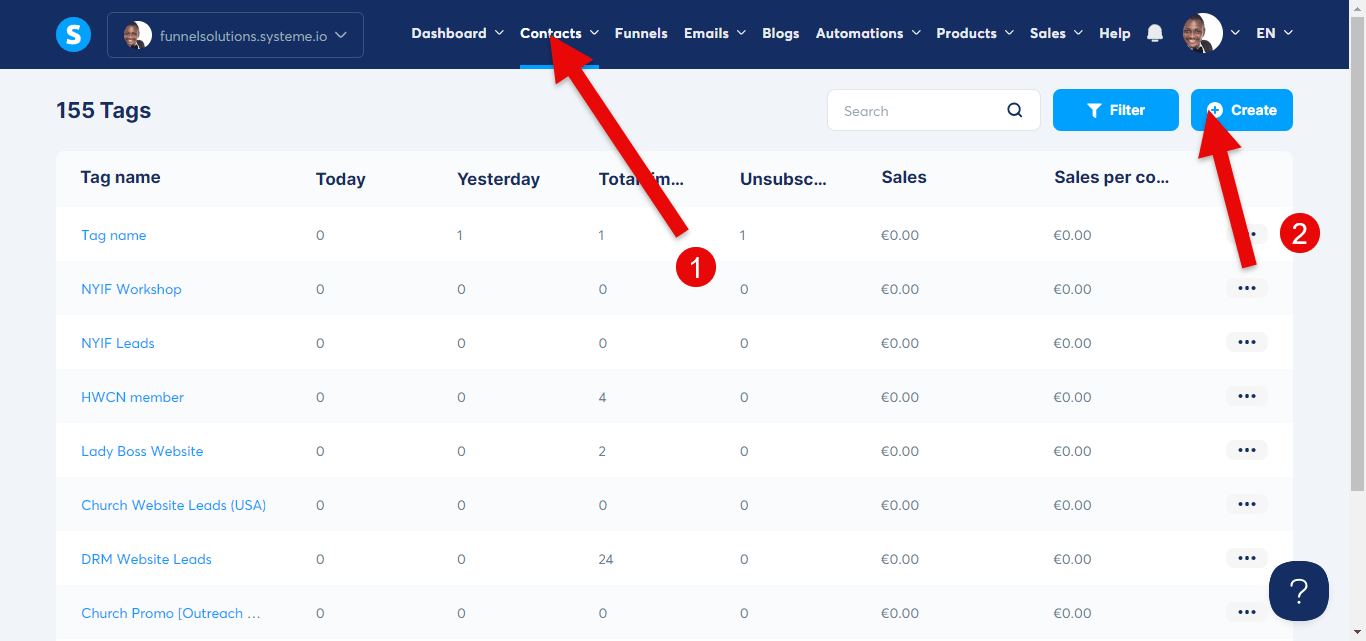
- From the main menu bar, click the "Contacts" tab to access the Tags Submenu (Image number 1)
-Click on “Tags” to access the Tags page.
-On the Tags page, click on the “Create” button at the top right corner (Image number 2).
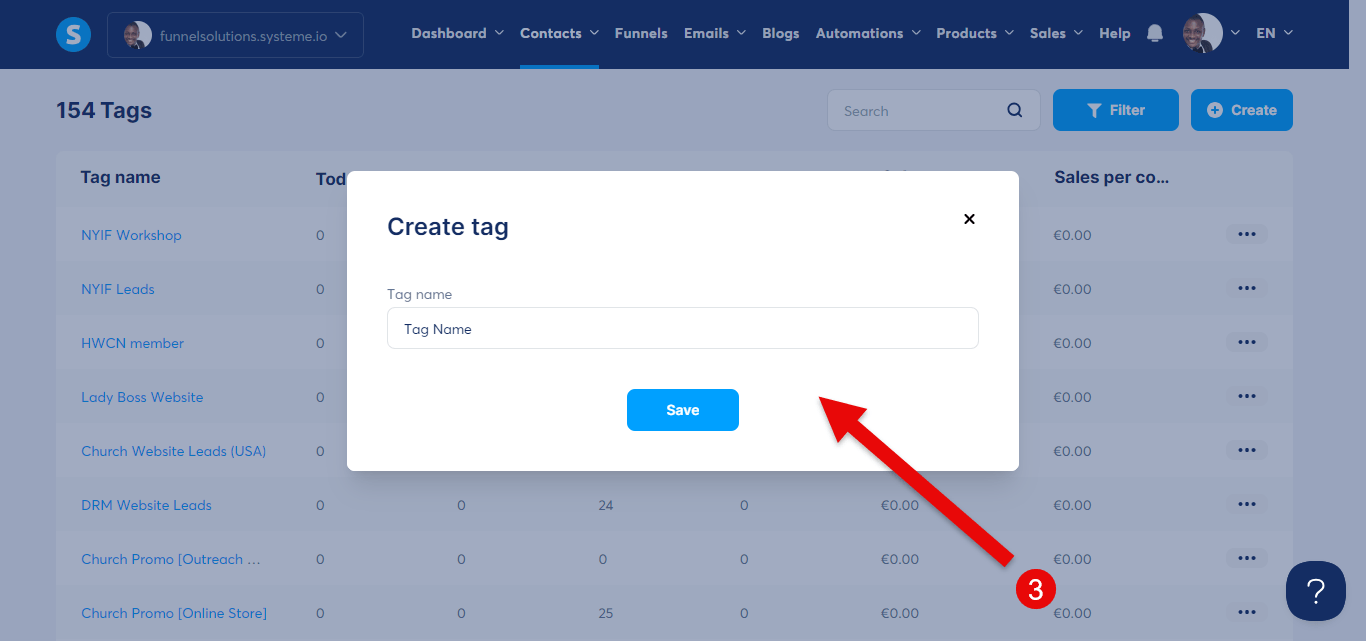
A pop-up will appear, fill the fields with a descriptive name for your tags;
then click the save button to save your tag (Image number 3).
Assigning tags to contacts;
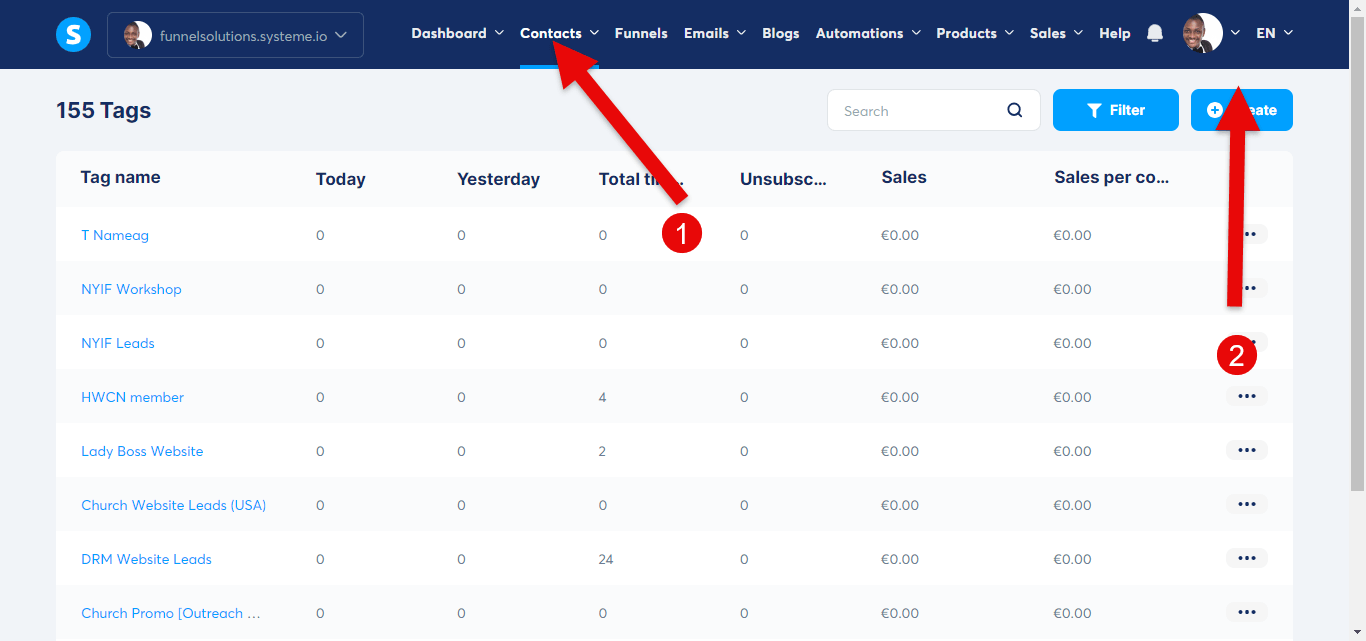
- Go to the main menu bar, and click on "contacts" to access the submenu (Image number 1).
- Click on contact to access the contact page.
(You can import contacts from your CSV file or create it manually)
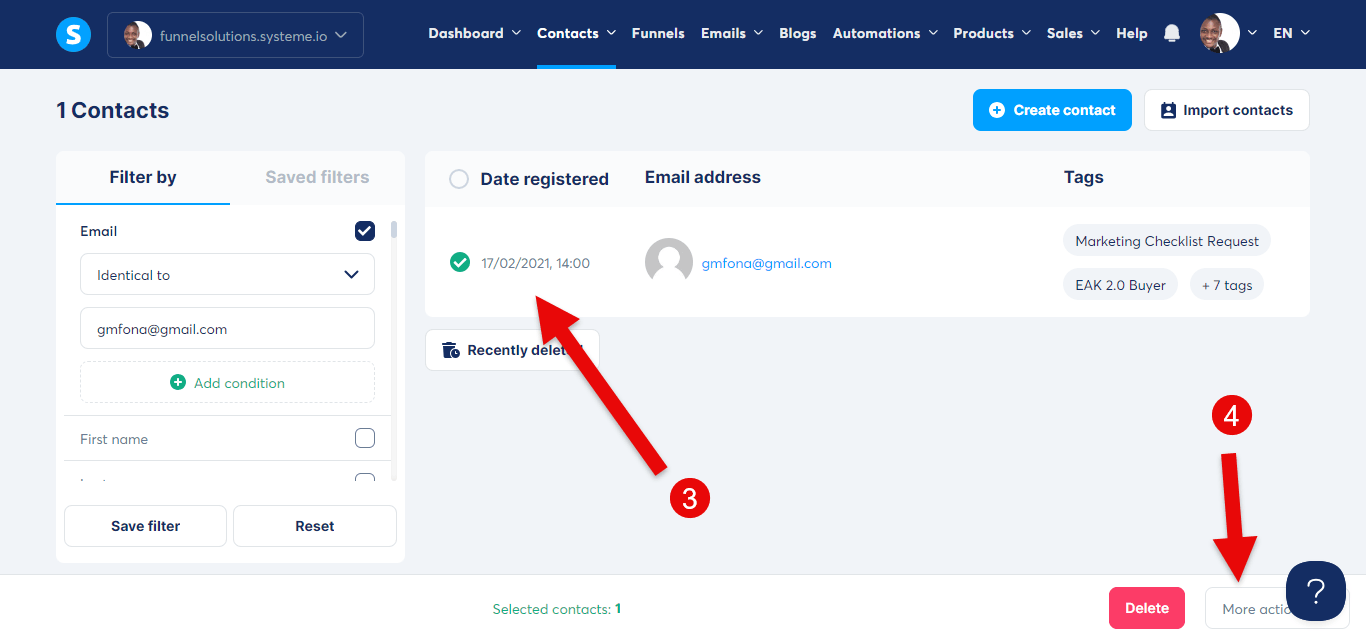
-Search or select the contact you want to tag and when you find it; check the box next to their email addresses (Image number 3).
A bottom pop will appear, click on the “More Actions” button a pop-up will appear (Image number 4).
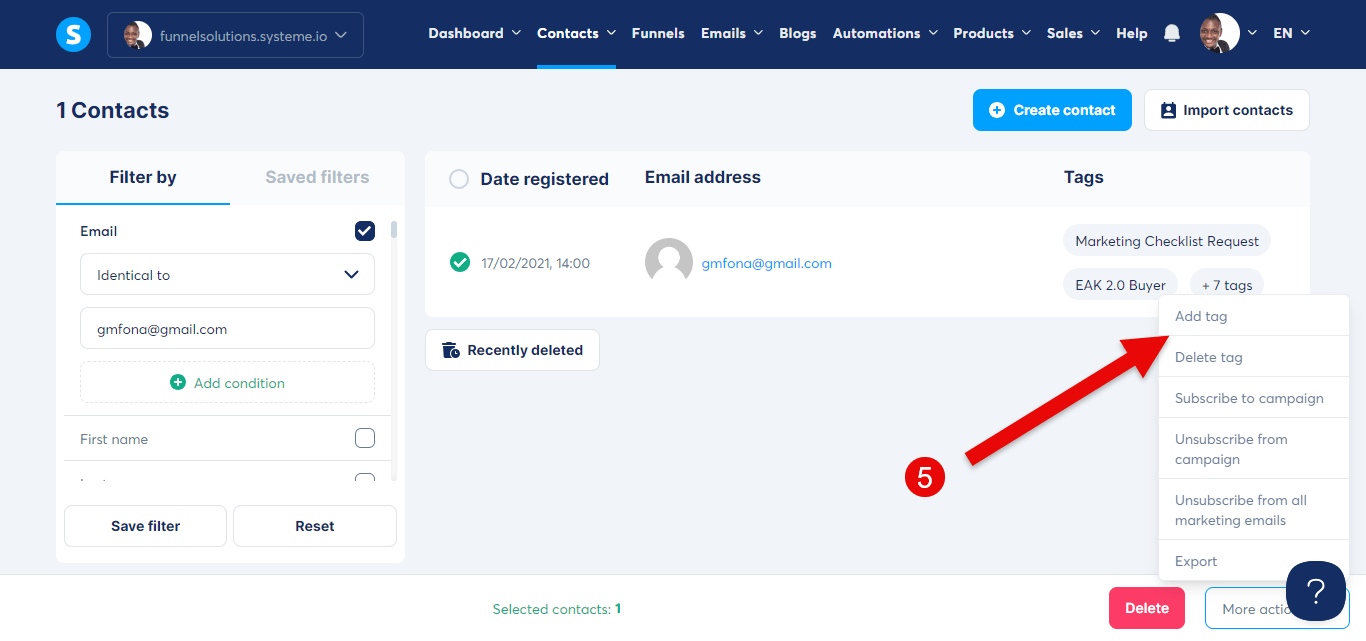
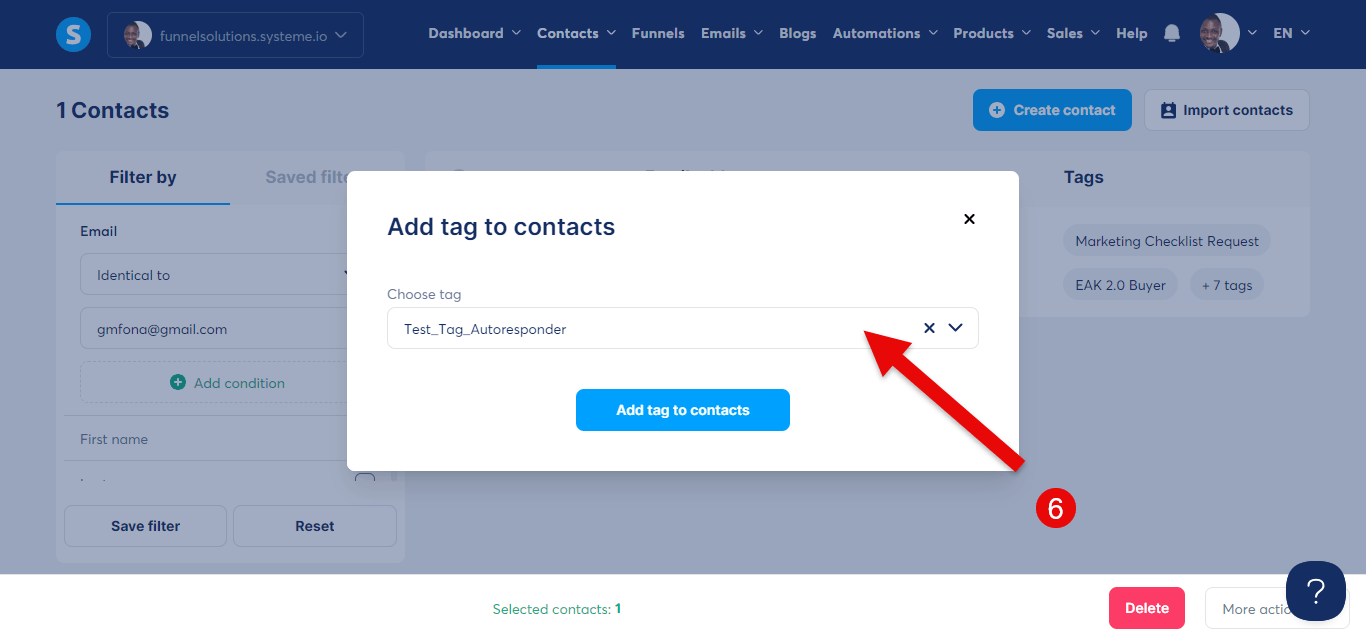
Click the "Add tag " (Image number 5) and choose your tag from the drop-down, then click “Add tag to contacts” (Image number 6).
Connect the tag to the funnel
First, you need to add automation rules:
This rule triggers specific actions such as sending an email or applying a tag based on your contacts’ actions; such as visiting a page or even clicking a link.
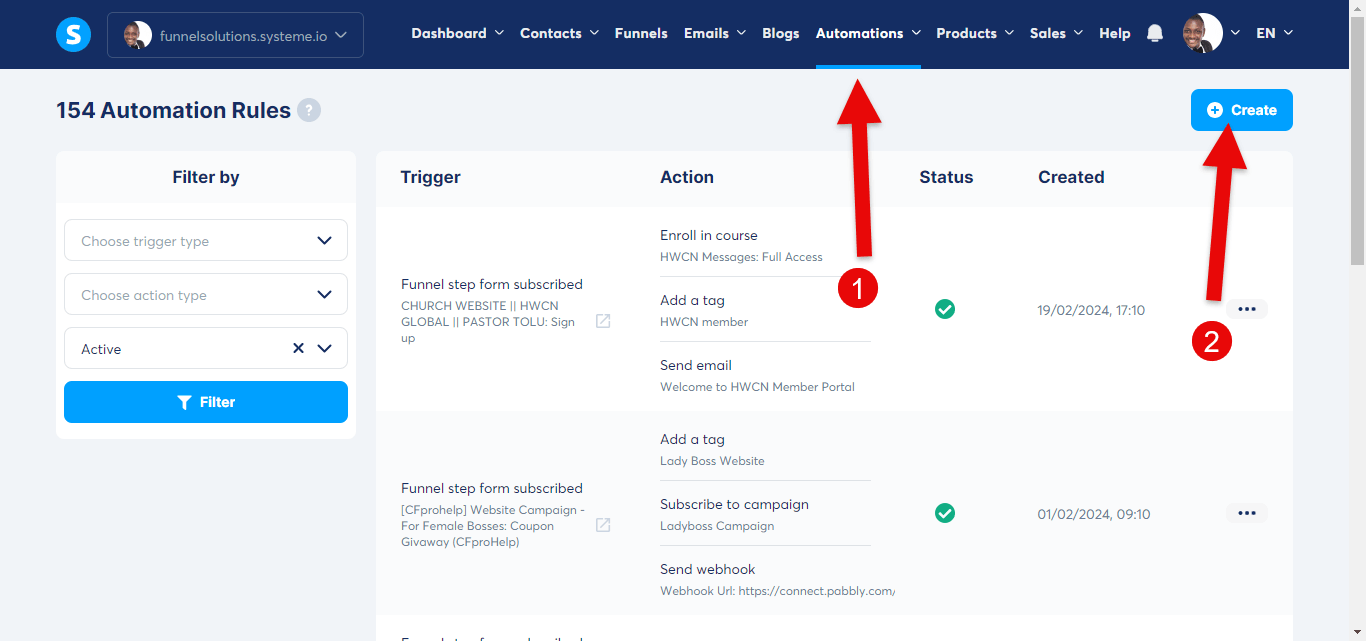
- Go to the main menu bar, click on the automation tab, and then submenu “rules” (image number 1).
click on the add "rules button" on the top right corner(number 2), this will take you to the Rules automation creation page.
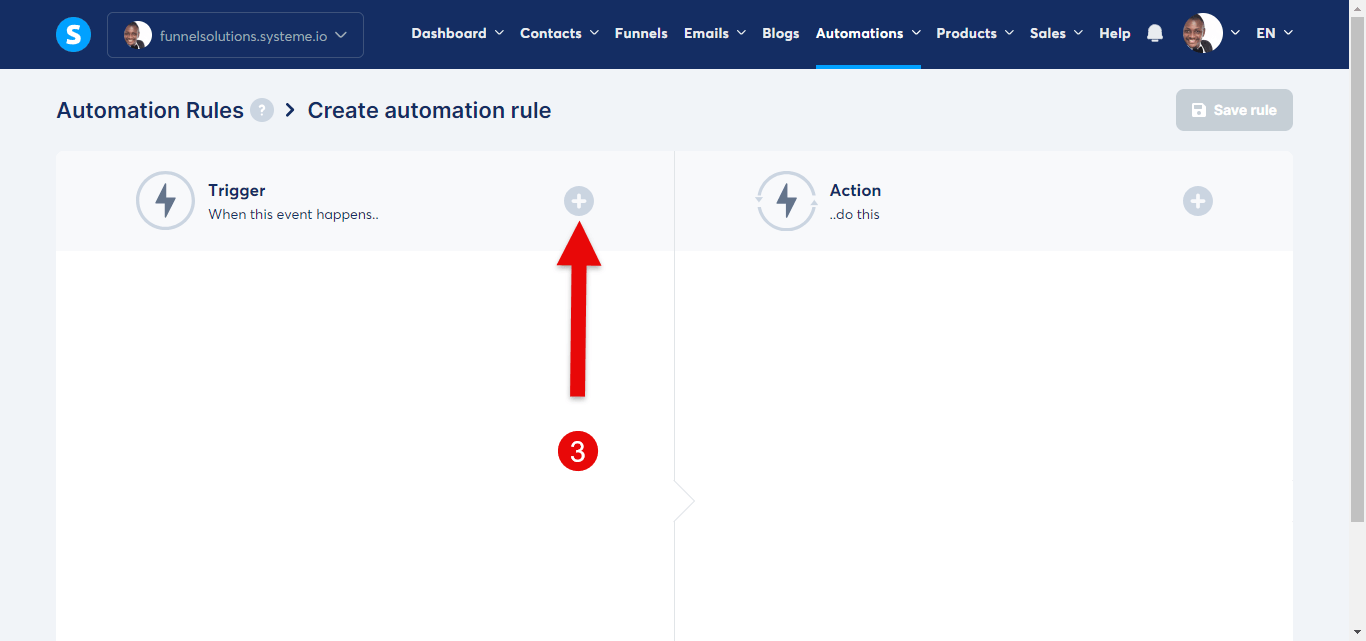
-On the page, you will see two columns for Trigger and Action.
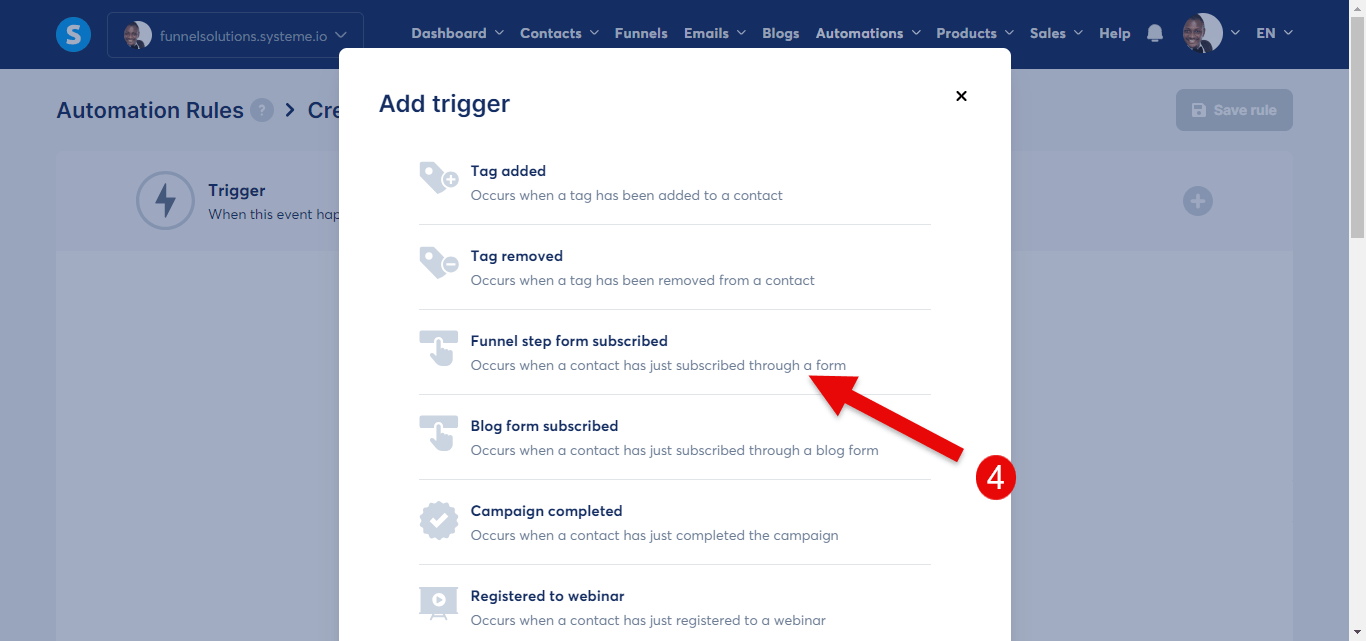
click on Trigger “+ button” (number 3) a pop-up will appear.
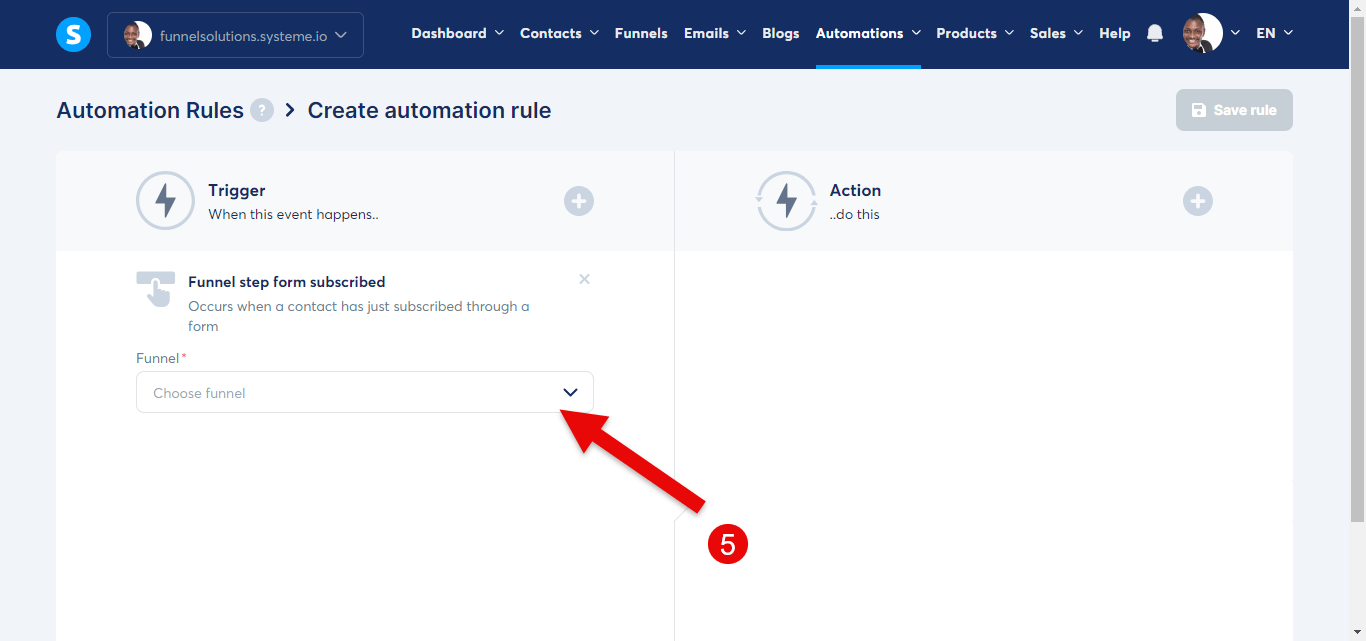
On the popup select “Funnel step form subscribed” then select the title of your page (number
Create an email campaign to go to new leads
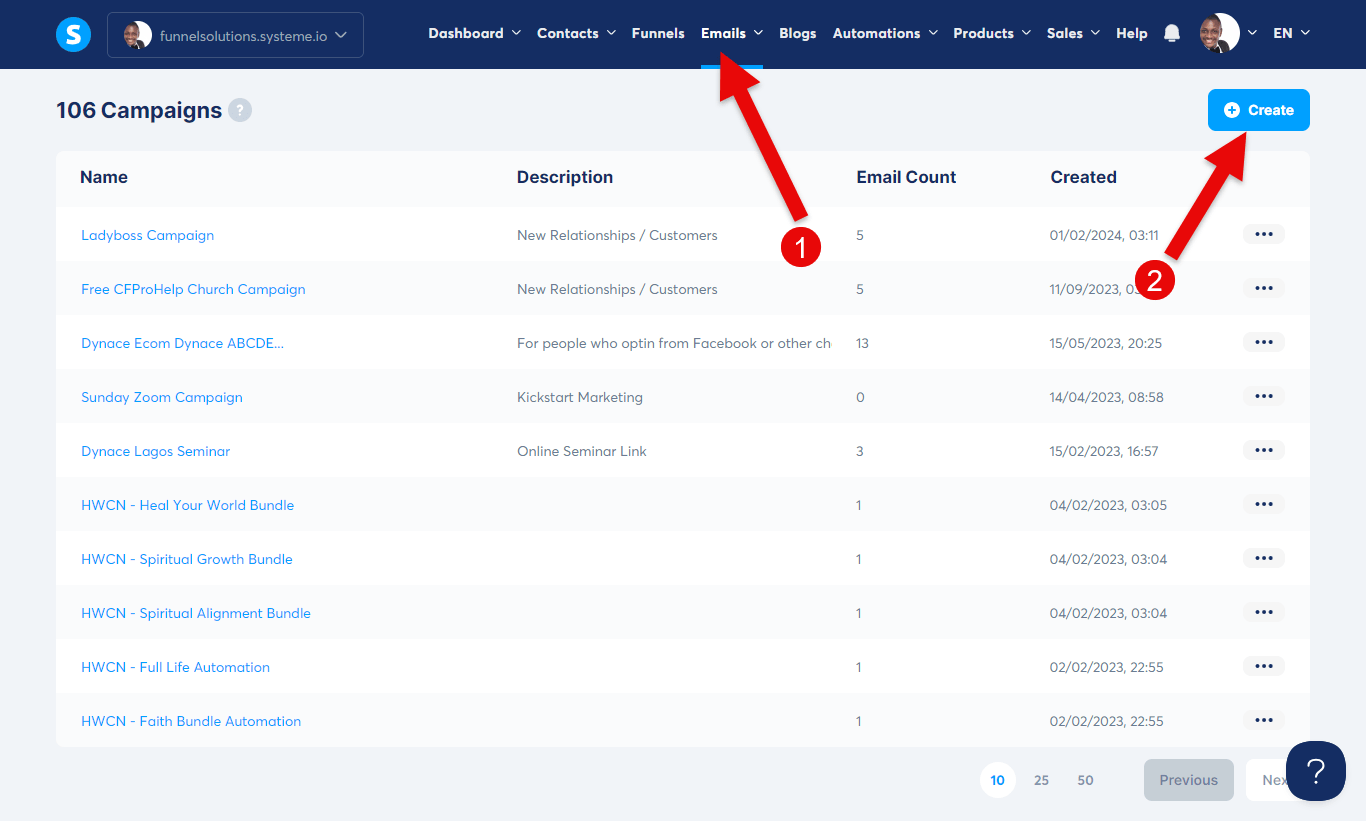
- Go to the main menu bar, click on the email, then click on the campaign submenu (Image number 1).
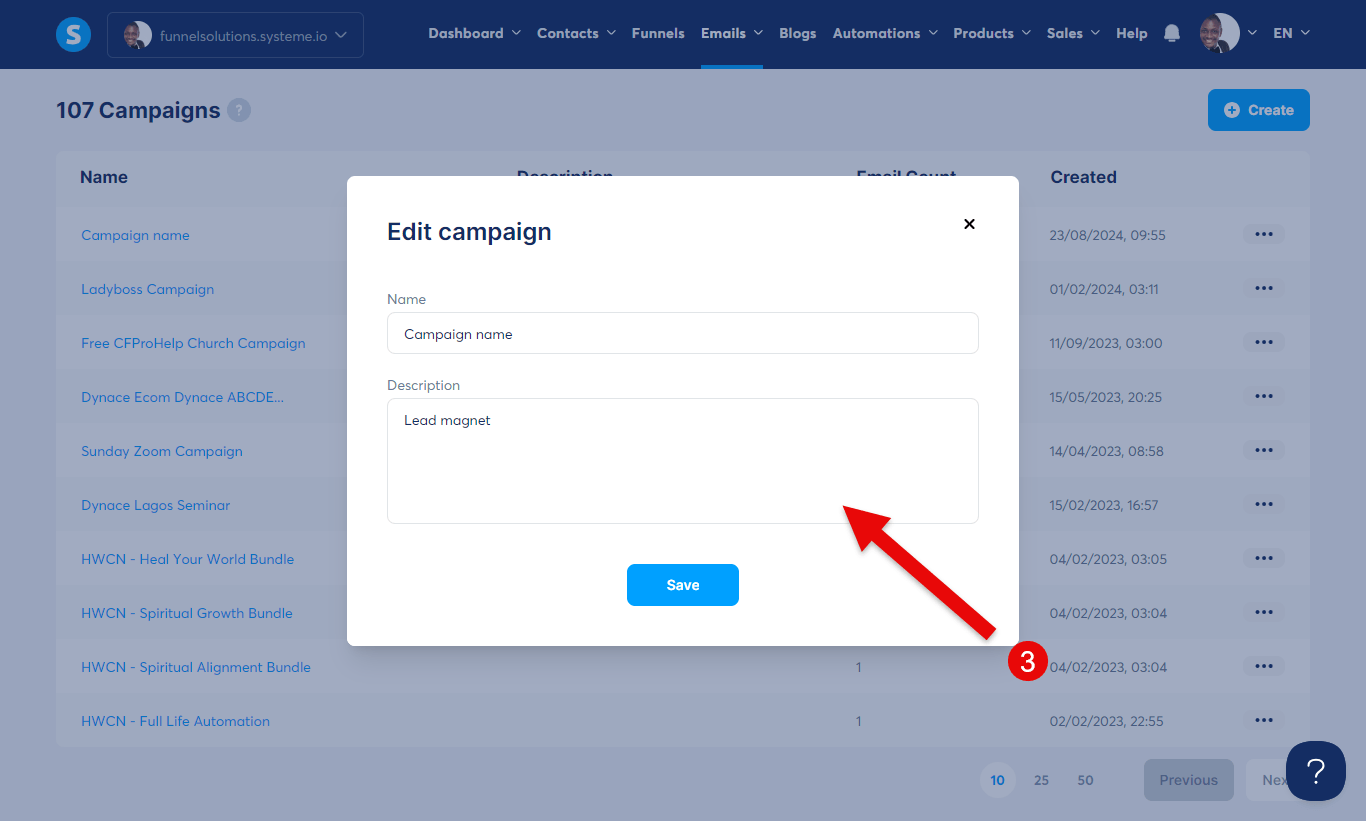
- Next, click on the “Create button at the top right corner”, a pop-up will appear, add a name and a description for the campaign (Image number 2 ), and click the save button.
-Next, click on the created campaign, this will take you to the next page.
On the page, click on the “Create button” on the top right-hand side to create your email.
A pop-up will appear, fill the provided field with the necessary information and select the editor of your choice (Classic editor or Visual editor)
Then click the save button
For Visual Editor:
The visual editor is just like the funnel page editor, it has a drag-and-drop canvas to visually add elements such as images, text, and buttons ( with text formatting as well)
- Additionally, you can lay out the content using sections and columns.
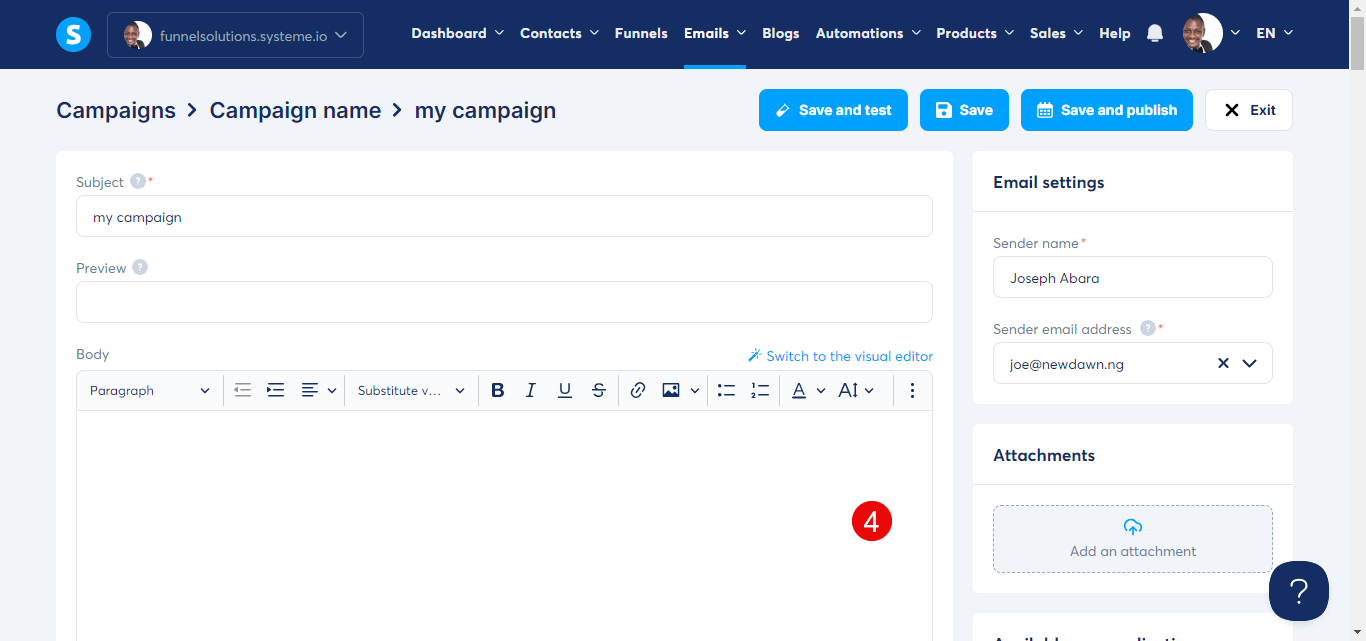
- When you are done with the email composition and configuration, you can:
=Save and test - to save your email.
-campaign and receive a test email.
-Save - to save your email campaign.
-Save and publish - to save and schedule your email campaign to be sent on a specific date.
-Exit - to exit your email campaign
see the image below.
save the changes, then click on "Exit" and go to the next step.
I recommend testing your mail by "Save and test" to receive a test email, this allows you to preview its appearance. Once satisfied, save the changes and proceed to next step
Email Campaign
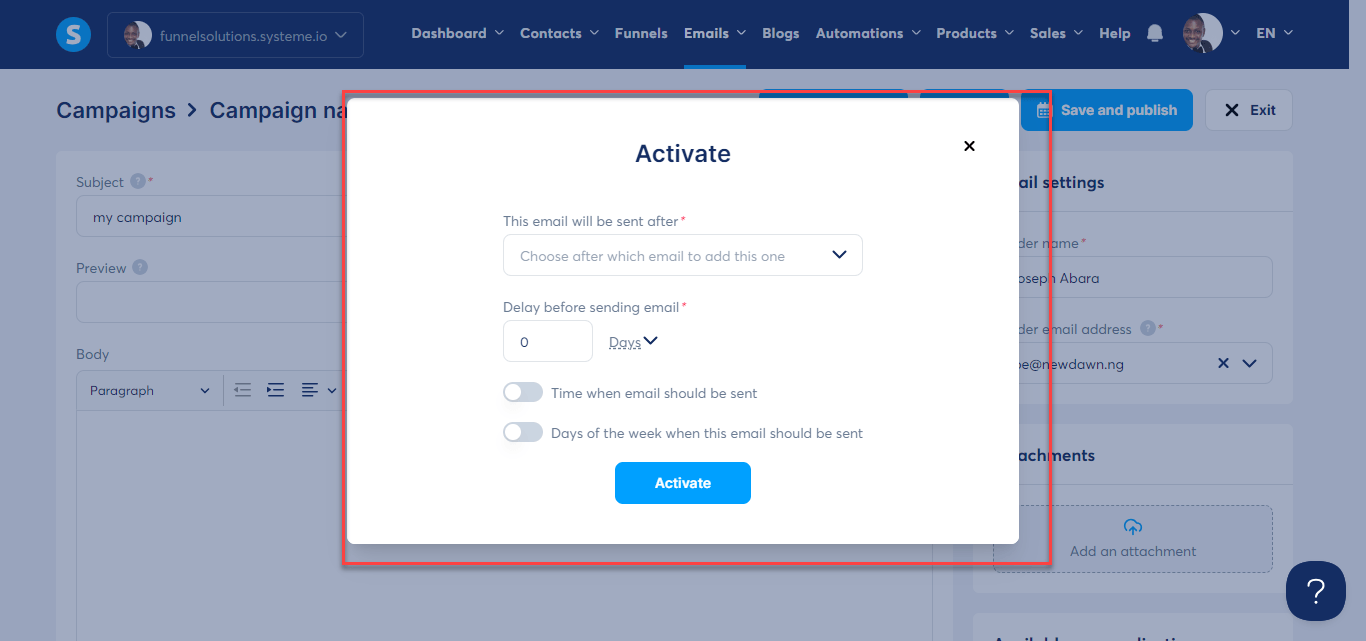
click on "Save and Publish" a pop-up will appear where you can configure the sending delays for the campaign. see the image below.
When you are done with the configuration, proceed to publish it.
Connect email campaign to funnel
Go to the main menu bar, click on the automation tab, and then submenu “rules” (image number 1).
click on the add "rules button" on the top right corner(number 2), which will take you to the Rules automation creation page
On the page, you will see two columns for Trigger and Action.
click on Trigger “+ button” (number 3) a pop-up will appear.
On the popup select “Tag added ”
ACTION
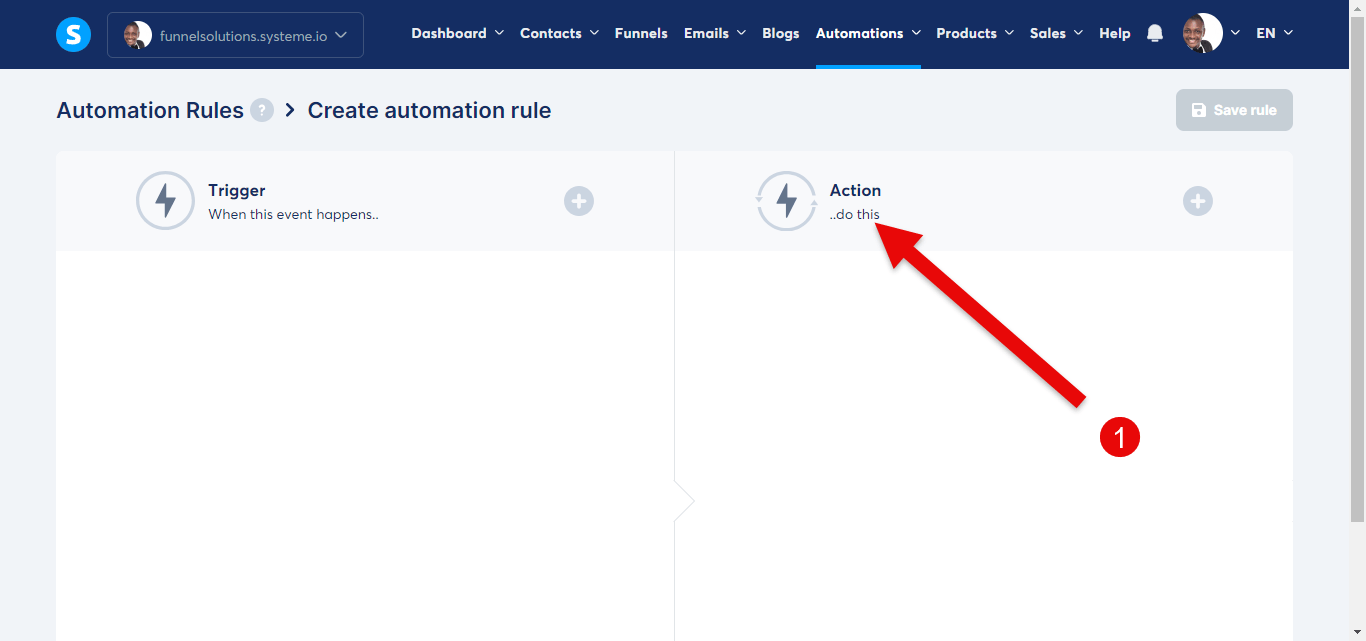
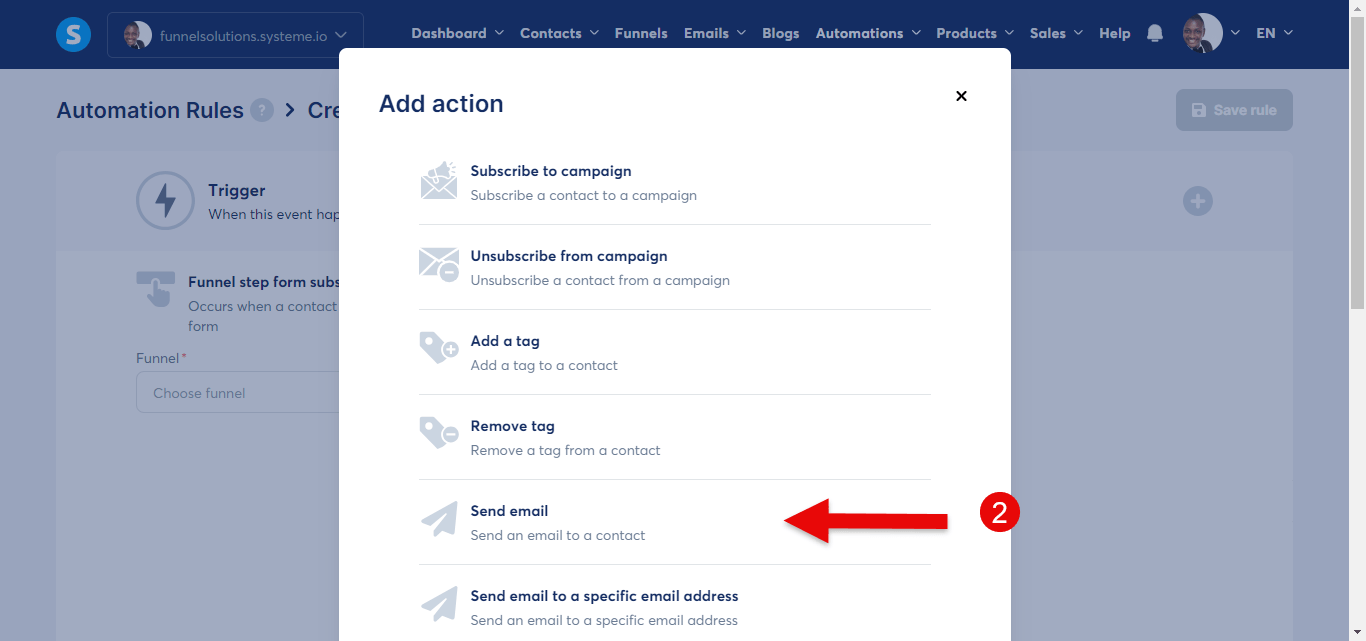
Go to the main menu bar, click on the automation tab, and then submenu “rules” (image number 1).
click on the add "rules button" on the top right corner(number 2), which will take you to the Rules automation creation page
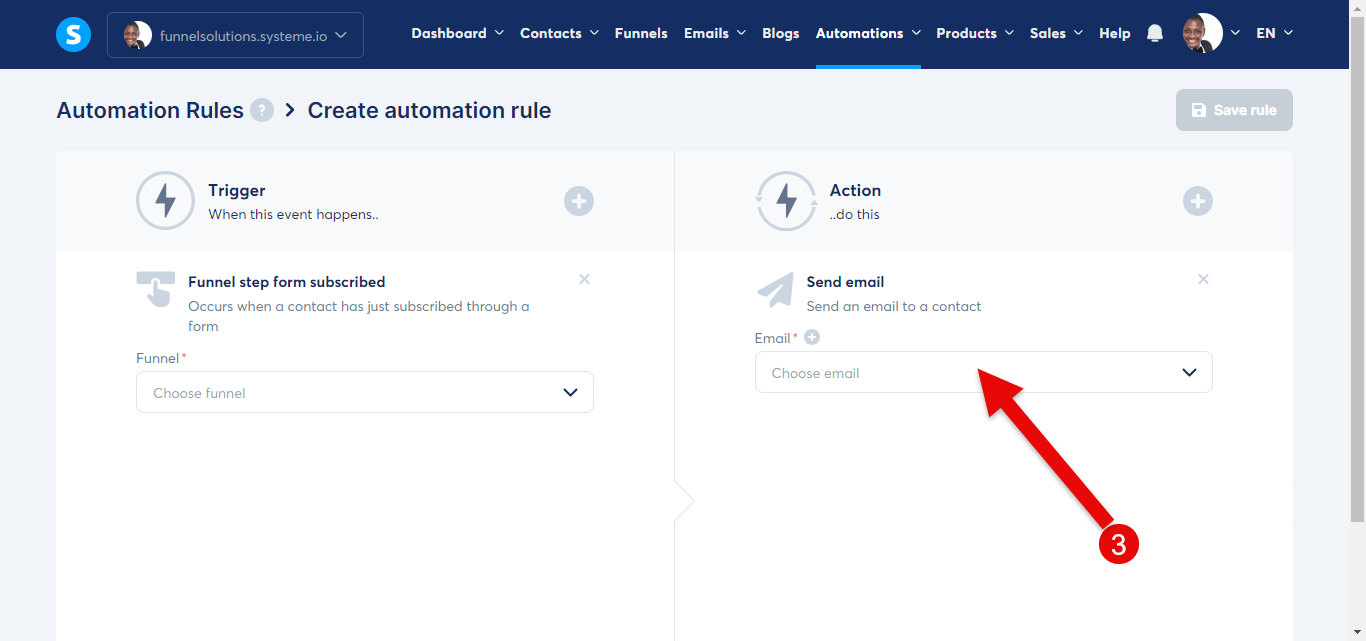
On the page, click on action “+ sign” (number 3) a pop-up will appear.
Create a thank you page.
Step 1
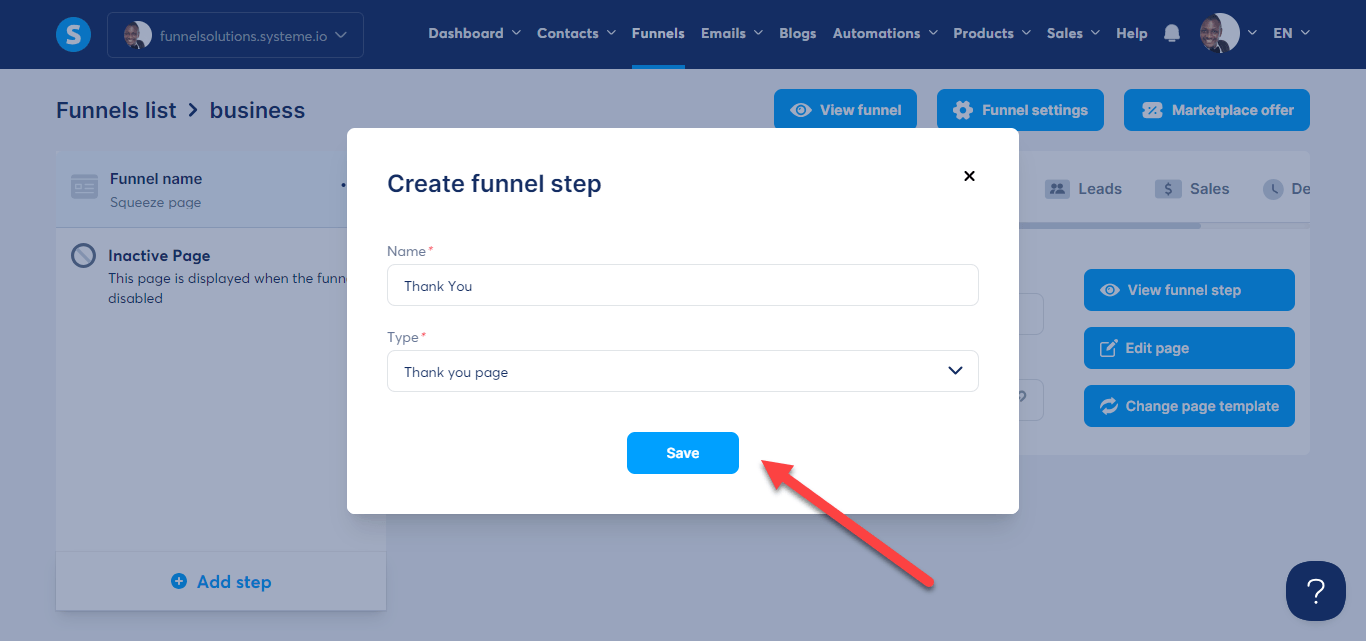
click on the “+ Add Step” button to create a page. Fill in the name of your page and click the drop-down and select "Thank page" then click save.
Step 2 — Choose a template.
From the list of templates, select any template of your choice, you can even preview it if you like to help you make a choice.
Step 4 — Edit
Click on the "edit button” to edit your page to suit your business needs.
See Images above

Lorem ipsum dolor sit amet, consectetur adipisicing elit. Autem dolore, alias, numquam enim ab voluptate id quam harum ducimus cupiditate similique quisquam et deserunt, recusandae.
Latest Articles
GET STARTED NOW!
The Best Time to Start Using Automation is Now!
Schedule a call and let's design a customized automation blueprint tailored to your business goals. Let's help you optimize your customer journey and boost conversions!
Start Scaling Your Results With Automation
Try similar courses to learn how to build apps without code and master your no-code skills.

Marketing Services
Leads Feeder System Build
Sales Funnel Development
Appointment Funnel Builds
Custom Funnel Development
X Advertising
Email Marketing Mangement
Website Management
One-on-One Coaching
Automation Services
Lead Follow-up
Appointment Generation
Referral Automation
Testimonial Acquisition
Customer Reactivation
Survey Automation
Blogging Automations
Webinar Email Automations
Execution Templates
For Network Marketers
Platforms
Zoho
Salesforce
Keap
Marketo
Hubspot
Clickfunnels 1.0 & 2.0
Gohighlevel
Systeme
Kajabi
Kartra
GrooveFunnels
ActiveCampaign
Zapier/Pabbly
Quick Links
About Us
Blog
Course Login
Webinars
FAQ
Affiliates
Contact Us
Privacy Policy
Terms of Sevice





hello@cfprohelp.com
What is CFprohelp? CFprohelp is a fast-growing marketing automation and advertising agency for expert teams and corporate firms in Africa
All Rights Reserved 2024 © CFProHelp Limited